
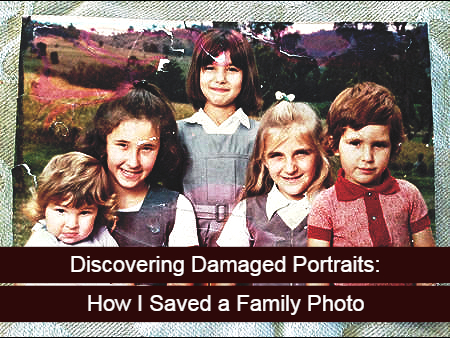
I was recently at my mother’s house in the country, and I found a huge box full of photographs. Luckily, it was a plastic box with a plastic lid, so we can assume that most of the creepy-crawly things out in the country might not have gotten into the box to make a mess and chew on the precious images. But while I was there, I went through all of the photographs and discovered a beautiful portrait of mum’s five kids, my siblings and I. Unfortunately, the family photo had not been framed properly, so it did not have a mat board between the image and the glass. The mat board is essential to keep the glass off of the image and protect it over time.
What I picked up was just the photograph and the glass, and the image was stuck to the glass. The worst part about the discovery, however, is that the portrait had fallen off the wall at some point and smashed into lots of pieces, as you can see. There were numerous, shattered pieces of glass stuck to the emulsion of the photograph. The emulsion is the light-sensitive coating on photographs, and if it is peeled away then the image can be completely lost. In this case, the glass was both shattered and stuck to the photograph, and beginning to peel away the valuable emulsion.
Step One: Determining What to Do

This is the condition of the print when I found it.
I was determined to save the image if I could, because it is a beautiful picture and a lovely memory. However, simply pulling at the glass would have ripped off the emulsion and completely ruined the image. Plus, the glass was quite sharp, broken apart, and sticking onto the print and cutting it. Since the emulsion was stuck to the glass, I had to find a way to release the adhesiveness without ruining the faces in the photograph. I filled a small tub with pure, filtered water, because it is softer and has fewer impurities than tap water and would not damage the emulsion.
Step Two: Patiently Waiting for Results

Here’s a close up of the damage.
The process of letting the family photo soak took about a week, as the water slowly worked its way under the glass. With this method, I hoped I could get the glass off of the emulsion without that thin coating actually peeling off the photograph itself. This part of the process was really quite distressing, because the glass was stuck to many of the faces. Three of our faces were not too bad; however, my face down on the left end, and that of my baby brother Daniel, were both completely stuck to the glass.
I continued to soak the image, and every day I would have a look and see if anything was beginning to lift. The secret to doing this is being very patient and not trying to force anything. If you try something similar, do not rip or pull at the glass. Instead, just let it sit and let the water work to get under the glass. Slowly but surely, I noticed that some of the shards of glass were coming up, lifting off the face on the bottom left and my face. Each day, more and more small shards could be removed, and after three days I realized that I could save all of the faces and that they were going to be okay.
Step Three: Removing the Rest of the Glass and Surveying the Damage

Tentative steps…the first piece of glass removed.
Saving the faces in the family photo was the most important part, but there were a few other spots where I knew the glass was severely stuck.

Big relief, I managed to save my face from the broken glass
You can see this in the images, including the bottom left corner where my arms were around my brother. After several days of being patient and occasionally, very gently moving the photograph around to try and get the water under the glass, I managed to lift it all off. Peeling it off was a slow, painstaking process with plenty of trial and error, but it was successful for the most part.

It’s a patience game for the last stubborn bits of glass
You can see in another picture here where the photograph is soaking in the tub of water, and there are a few places I could not save. In those places, the emulsion scratched and ripped and is still stuck to the glass, or left some discolouration. In fact, if you look at the bottom right side, you can see where the emulsion has been completely ripped off and is gone. You can also see other patches of removed emulsion and scratches, but they didn’t worry me as much since our faces were safe. Just to save those faces was so important, but I did manage to repair a few other minor spots. You can see where a bit of my forehead, my hands, and my brothers arms are damaged, but I managed to eventually soak the emulsion back off the glass and stick it back on the picture.
Step Four: Drying and Scanning the Print

Success. All the broken glass has been removed
In the final image I have shared, you can see the dried print laying on a tea towel. It is still easy to tell how much damage was done because of the shattered, mat-less glass, but I am pleased to say that, for the most part, the faces have been saved and the image has been saved.
The final part of this process will be to take the photograph to a professional with a flatbed scanner to have it digitally scanned. I am not going to put it through a roller or feeder-style scanner, because in some areas the emulsion is already lifting and is quite damaged. The rolling action of a scanner could actually tear the emulsion off and make it worse.

The final result, one precious family photo saved and preserved.
So, I’ve let the image dry now for a couple of weeks, and following the flatbed scan I will get it retouched and make extra prints for my brothers and sisters. It has been a tedious but extremely rewarding journey from my initial shock and dismay at finding the original, damaged image to now. This image is something that is precious for us. It is a beautiful memory of us kids at Jiggi School in Northern New South Wales can be preserved forever, for all of us.
How to Preserve Your Memories with a New Family Photo
As much as I loved finding and preserving an old memory, I also love creating new portraits for families to help them capture their own memories on film. My sessions include a mix of both formal, posed shots and more casual and fun lifestyle shots. If you have any questions or would like more information about session options, feel free to call or email me for a prompt response.
Talk soon,
Margherita :)
Liked this post? You can share it below.
Follow me on Facebook with the buttons up the top of this page.
Or leave a comment below!